In my recently acquired 170A (going through annual insepection now), one fuel gauge float has lost boyancy and sank. I read in the 170 book about constructing a new cork float. I am considering another tack and would appreciate some input.
I have access to a vacuum chanber and was wondering if placing the gauge assembly in the chamber at a deep vacuum would this sufficiently remove the gas that has permeated the float. Afterwards sealing with a good grade marine varnish.
Comments / suggestions?
Al Culbert
FUEL GAUGE WOES
Moderators: GAHorn, Karl Towle, Bruce Fenstermacher
-
Bruce Fenstermacher

- Posts: 10321
- Joined: Tue Apr 23, 2002 11:24 am
When purchased in 98, my 170A did not have an interior. The old gauges looked bad and were suspect so I replaced with new to match the new headliner, etc. Have really enjoyed the new gauges over the years, they have worked great and look great! Think I went thru Aviall, do remember getting the pair for around $80.
Joe
51 C170A
Grand Prairie, TX
51 C170A
Grand Prairie, TX
-
Jeff Palmer
- Posts: 31
- Joined: Sat Dec 18, 2004 4:10 am
Fuel Gages
My floats sank too. I bought new fuel gages from Aircraft Spruse for about $80.00. They didn't fit. Since I already bent the rod that the float went on, I couldn't return them. So I put the new corks on my old gages. $80.00 for corks. The shaft, on the new gages, that reaches back to the rod and gear is too short. Every gage that I have seen for sale, that they say is for the 170, is too short. The rod hits inside the tube leading into the tank. This gives you a range of 1/4 to 3/4. The shaft has to be the length of the neck on the tank, 3 1/2 inches long, to work. I thought that I had some strange gas tanks. So I went to a yard where they had a stack of 170 and 172 gas tanks. All of them had the same 3 1/2" length neck where the gas gage goes. So I was under the impression that nobody makes a gage that works in the 170, or a 172 for that matter. I need new gages. Where can I get some?
-
David Sbur
- Posts: 43
- Joined: Sun Sep 26, 2004 10:43 pm
Floats sinking...
My Cessna 140 had sinking floats. Took them out, dried them for a week or so, then sealed with a few coats of Butyrate Dope (I think it was Butyrate, might have been nitrate, sorry, can't be sure). Floats have performed perfectly for over 10 years now. The dope was from an old timer who said that's what they did to the cork Cub floats. It was kind of a slightly thick, amber to purplish color. Probably been around awhile. Can't argue with success.
-
Jeff Palmer
- Posts: 31
- Joined: Sat Dec 18, 2004 4:10 am
Blueldr, Hi. No, I am talking about the part that is cast to the gage where the magnetic coupling and shaft goes back to the gear that is turned by the float rod. It's too short on the new gages. The gear winds up only 2" or so down the neck of the tank. Then the rod hits inside the neck which does not allow a full swing of the gage. I wouldn't want that rod hitting in there any way, even if it did work. That gear, that is turned by the float, needs to be 3 1/3 inches away from the seating surfice of the gage. Does anyone sell a gage like that?
-
zero.one.victor
- Posts: 2271
- Joined: Tue Apr 23, 2002 12:11 am
I'm waiting for some of the seaplane guys to pipe up-- I'm sure some of them have experience with sinking floats.......... 
On a more serious note-- regarding the original post, I wouldn't think that any kind of special vacuum chamber is needed to dry out the corks-- remember, gas is very volatile. No rocket science required, it seems like just setting them out in a warm dry place for a few days would do the trick, then seal them with some spar varnish.
Or maybe buy some new corks-- I can't remember the size & shape of the factory corks, but maybe the local hardware store would have something suitable. No PMA though.....
Eric

Sinking Floats
Steve Grimsley's article in the 170 book works well. I did mine 6-7 yrs ago (left side--or port side to the nautical types). I found the only really tough thing was finding corks. Use to be you could find corks of vrs sizes almost anywhere, but now they seem to be akin to hens teeth. However I found some at a Michaels craft store (none were large enough by themselves, so I glued two together). After the two corks were dry, I sanded them to the shape of the orginal, put the metal weights back in and put several coats of varnish ( may have been marine type--I don't remember--there goes that nautical stuff again) and reinstalled. So far the unit has worked like a champ with no problems. One thing I did different from what Steve did was I did not bend the rod to remove the cork float. I used a hammer and I think a blunt ended punch & rounded the end of rod as best I could and then ground off the end just enough for the washer to slide off, then the cork float. When I reinstalled the float on the rod, I slid it on, put the retainer washer on the rod and hammered to make the rod end so the washer couldn't slide off and reinstalled the unit. There may be a better way to do this, but I didn't want to be bending the rod and then trying to be sure I got it back exactly as it was orginally.
OLE POKEY
170C
Director:
2012-2018
170C
Director:
2012-2018
-
Jeff Palmer
- Posts: 31
- Joined: Sat Dec 18, 2004 4:10 am
Fuel Gauge
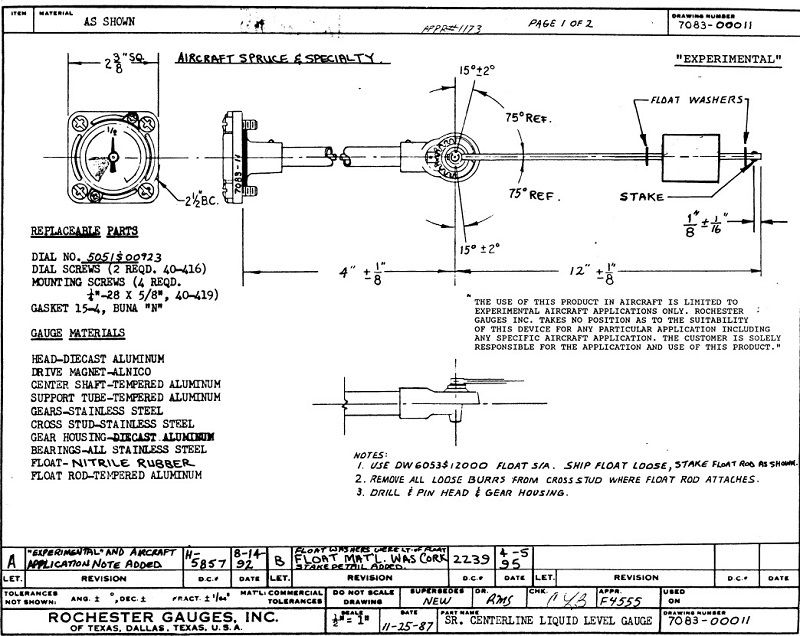
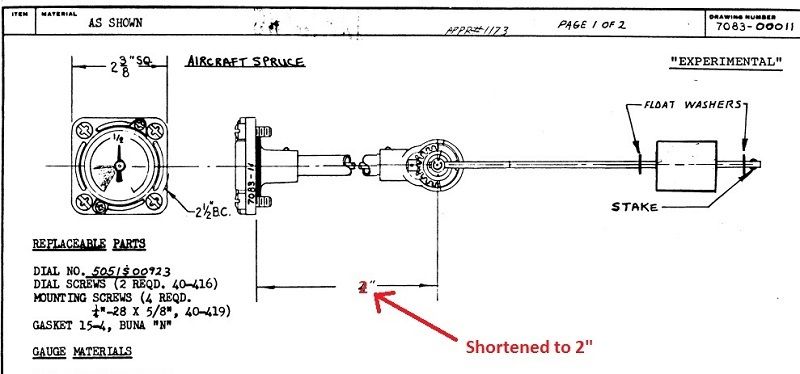
Aircraft Spruce part number 05-16700, about $50.00, look the same but will not work in a Cessna. Everything matches up except the length from the gauge gasket is too short. Does anyone know where to buy new gauges that will work?

Re: Fuel Gauge
Actually, it does work. They are what was used in my airplane by it's restorer, and they are wonderfully accurate. However, they must be calibrated by "bending" the float wire into a shape that will allow the gauge full movement.Jeff Palmer wrote:Aircraft Spruce part number 05-16700, about $50.00, look the same but will not work in a Cessna. Everything matches up except the length from the gauge gasket is too short. Does anyone know where to buy new gauges that will work?
I asked the restorer about this issue after reading this thread and the following is a copy of the email exchange:
Hello, Bill! And Happy New Year!
I want to thank you for sending the yellow tag for the engine mount. I appreciate the kind thoughtfulness.
It also prompts me to ask you a question.
When you re-did the fuel gauges, what did you use? It seems Aircraft Spruce handles a generic fuel gauge made by Rochester which appears identical, but one of the forum participants stated that when they tried to use it, that the "tube" the gauge resides in is too long and limits the range of the float. He states that the fuel gauge must have the operating gear at least 3.5" away from the dial itself or it will not have full range of motion.
Not having ever been there or done that.... And Rochester quite unwilling to detail the difference between what they sell to Spruce vs what they sell to Cessna...... can you shed some light on the subject?
Thanks.
George H
Back at you on the Happy New Year!
The only new gauge solution is buying the Aircraft Spruce gauge since the gauge has the nice 1/4 tank red arc. I talked with Rochester several years ago since we did quite a bit of business with them at the time. AS&S is the only customer for the aforementioned generic gauge. It is as you mentioned not the right geometry in that the arm is too long. You can buy the AS&S Rochester gauge and shorten the arm to the proper geometry by comparing it to a removed unit. The modification is fairly simple. Remove the cork retention clip, measure and cut the rod, bend the rod, reinstall the cork. I'm sure someone out there has an old Scott gauge you can take measurements off of.
(Your airplane) was the victim (my opinion) of an unmodified gauge. Check your NTSB database for cause of incident. The aircraft flew from one airport to another about ten miles apart and ran out of fuel.... Years later, when I had the empty tanks sitting on the bench upside down prior to restoration I noticed that the tanks were indicating only 3/4 full. Hmmm, I thought. That seemed sort of goofy but not a big deal since you would know when a tank is full when you fueled it. I then flipped the tanks over and the gauges read 1/4 full. That's when the light came on! The golden rule of Cessna flying is to never take off with less than 1/4 tanks. These things always would read 1/4 even though they were bone dry. When I removed the errant gauges then I noticed that the gauges were unmodified Rochester units. I'm pretty sure that the unmodified gauges were the smoking gun, so to speak.
Whenever your folks are installing gauges encourage them to make sure that the gauges will read empty properly.
...
Later,
William
I'll add only one thing: The 1/4 range placarded "No Takeoff" is a good idea. But....notice that it is not a actual restriction. It is not a limitation in the aircraft Type Certificate nor is it a limitation in the Approved Flight Manual. (but it's still a good practice.) gh
'53 B-model N146YS SN:25713
50th Anniversary of Flight Model. Winner-Best Original 170B, 100th Anniversary of Flight Convention.
An originality nut (mostly) for the right reasons.
50th Anniversary of Flight Model. Winner-Best Original 170B, 100th Anniversary of Flight Convention.
An originality nut (mostly) for the right reasons.
-
Jeff Palmer
- Posts: 31
- Joined: Sat Dec 18, 2004 4:10 am
Fuel Gauges
Wow! Thanks gahorn. That is what I had. It doesn't matter how you bend or shorten the rod, you cannot get a full range of motion with the gear head only 1/3 of the way down the tube. You would think that by now AC&C would have put out a notice about this. I bought these gauges back in 1992. They must work in some other application, perhaps in expiramental planes. Well, I guess I'll be stuck with my old ugly gauges, unless I go electric. I like manual things though.
OK, Well, I'm not sure we're on the same hymnbook. The point I am making is: The generic gauges sold by Aircraft Spruce can be made to work properly by shortening the float-gauge wire, and bending to conform to the tank and gauge-flange. It is the generic gauges which have been installed into my airplane, and which work quite well, as per the restorer's message.
'53 B-model N146YS SN:25713
50th Anniversary of Flight Model. Winner-Best Original 170B, 100th Anniversary of Flight Convention.
An originality nut (mostly) for the right reasons.
50th Anniversary of Flight Model. Winner-Best Original 170B, 100th Anniversary of Flight Convention.
An originality nut (mostly) for the right reasons.
-
alaskan99669
- Posts: 278
- Joined: Tue Aug 09, 2005 9:49 am
Re: FUEL GAUGE WOES
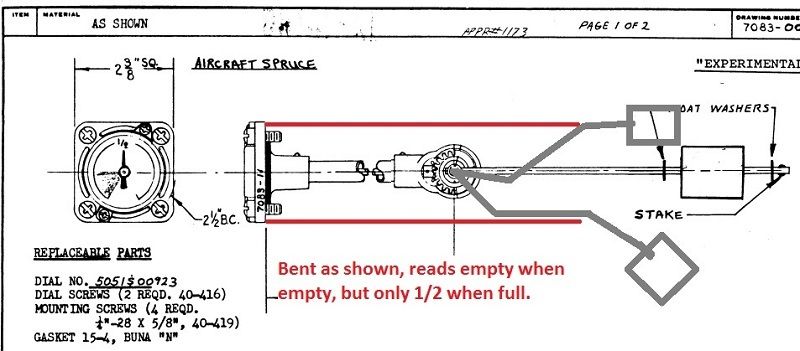
I see what Jeff is saying. From the drawings from AS&S, it looks like the gear was at one time 4" from the gauge. But looking at the photo AS&S published and from Jeff's description, the gear is only 2 or so inches from the gauge. So making my own mark-ups from their drawing I was able to get the gauge to read zero (in theory) when the tank is empty by bending the wire, but it will still interfere when full and stop reading at anything over 1/2 tank.


Corey
'53 170B N3198A #25842
Floats, Tundra Tires, and Skis
'53 170B N3198A #25842
Floats, Tundra Tires, and Skis
-
Kurt Aichele
- Posts: 121
- Joined: Sun Dec 03, 2006 3:44 am
Re: FUEL GAUGE WOES
Could you just replace the floats with these new floats from Aircraft Spruce?
http://www.aircraftspruce.com/catalog/t ... kkey=17088
http://www.aircraftspruce.com/catalog/t ... kkey=17088